


![]()
PacketStreamer
Deepfence PacketStreamer is a high-performance remote packet capture and collection tool. It is used by Deepfence's ThreatStryker security observability platform to gather network traffic on demand from cloud workloads for forensic analysis.
Primary design goals:
- Stay light, capture and stream, no additional processing
- Portability, works across virtual machines, Kubernetes and AWS Fargate. Linux and Windows
PacketStreamer sensors are started on the target servers. Sensors capture traffic, apply filters, and then stream the traffic to a central receiver. Traffic streams may be compressed and/or encrypted using TLS.
The PacketStreamer receiver accepts PacketStreamer streams from multiple
remote sensors, and writes the packets to a local pcap capture file
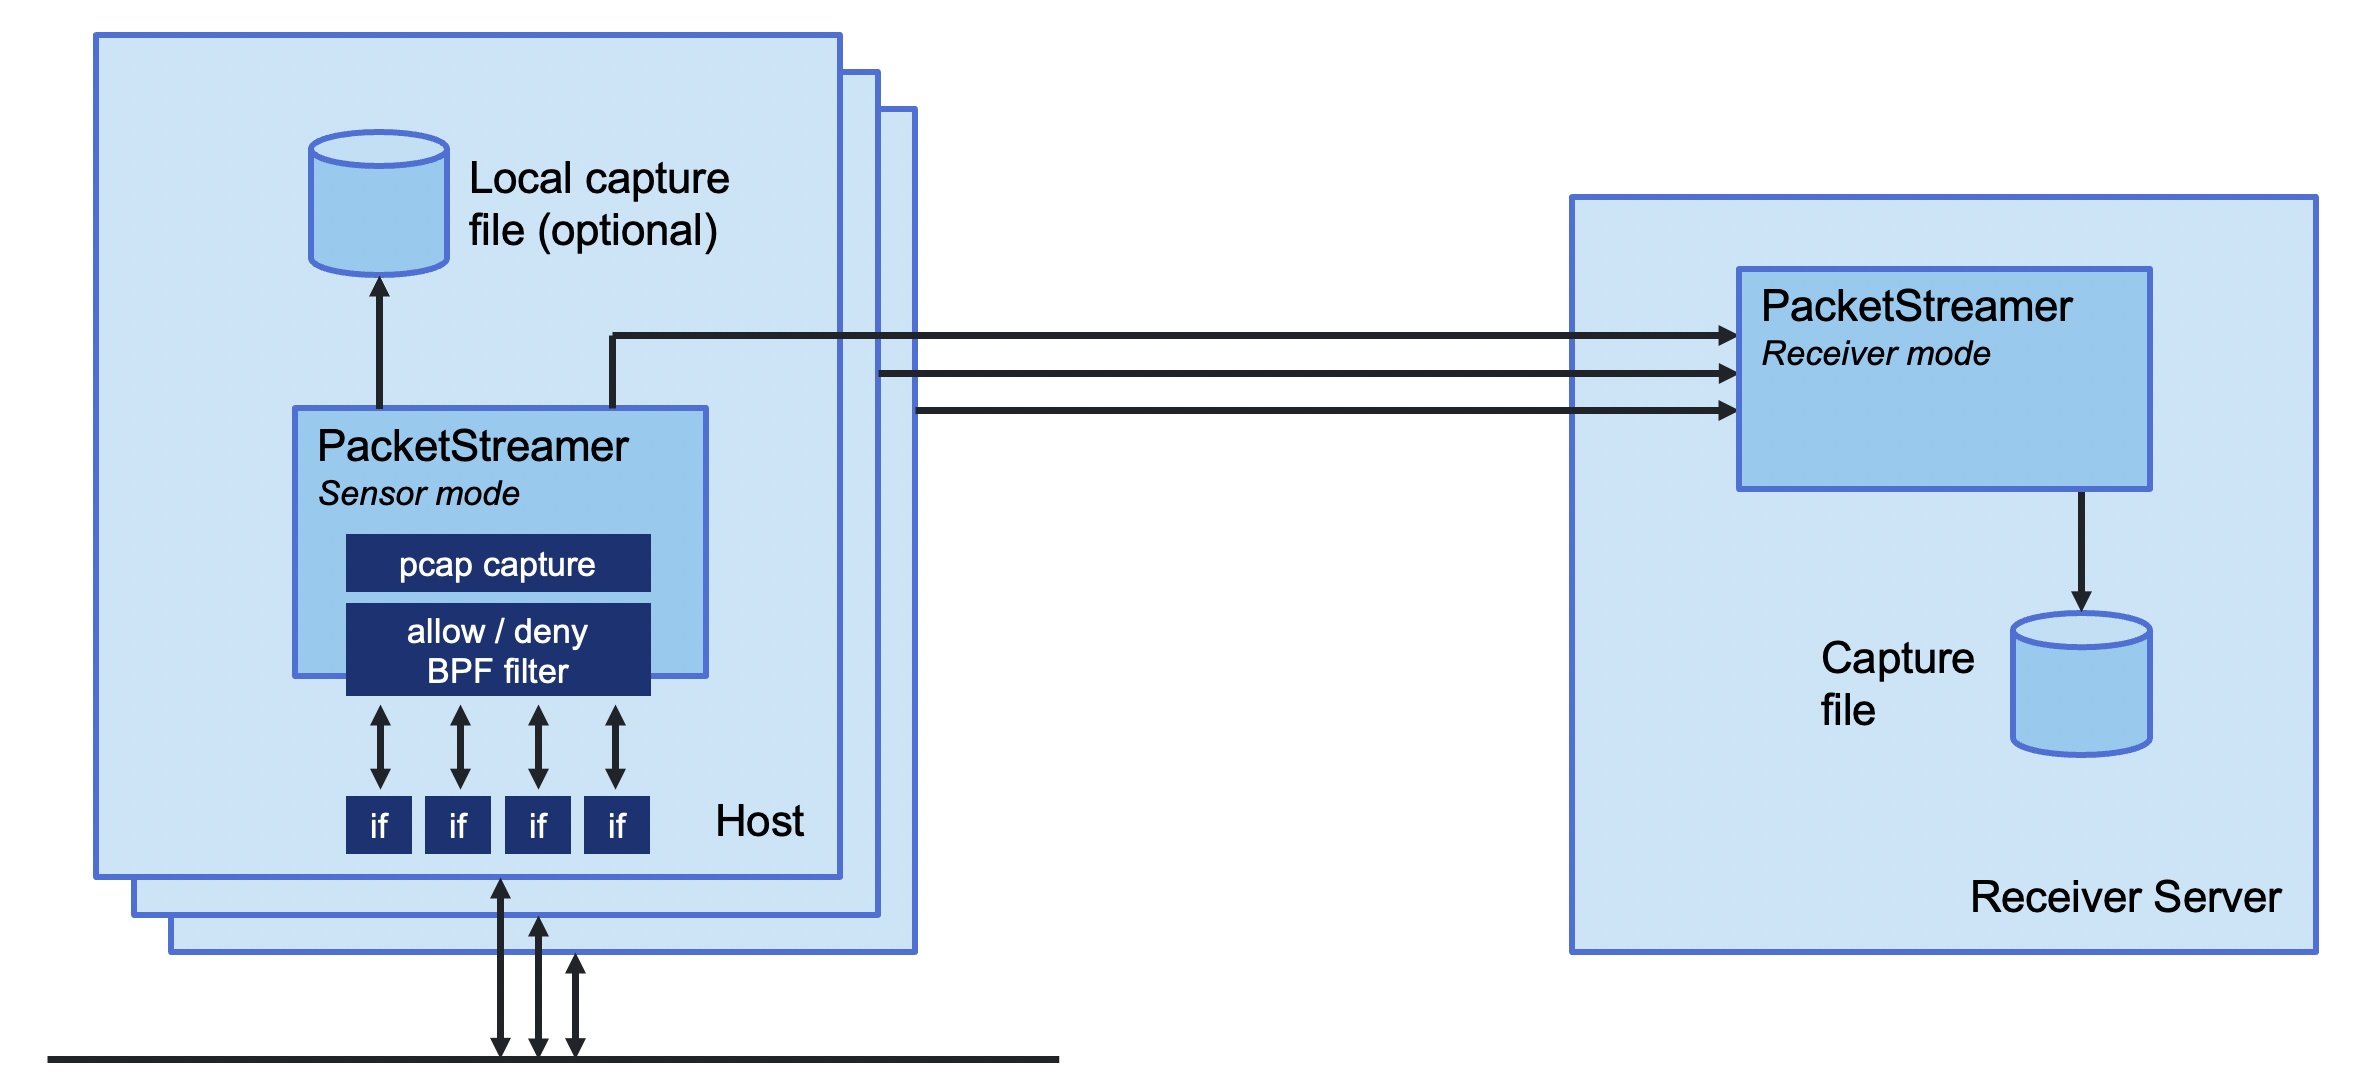
PacketStreamer sensors collect raw network packets on remote hosts. It selects packets to capture using a BPF filter, and forwards them to a central receiver process where they are written in pcap format. Sensors are very lightweight and impose little performance impact on the remote hosts. PacketStreamer sensors can be run on bare-metal servers, on Docker hosts, and on Kubernetes nodes.
The PacketStreamer receiver accepts network traffic from multiple sensors,
collecting it into a single, central pcap file. You can then process the
pcap file or live feed the traffic to the tooling of your choice, such as
Zeek, Wireshark Suricata, or as a live stream for Machine Learning models.
When to use PacketStreamer
PacketStreamer meets more general use cases than existing alternatives. For example , Use PacketStreamer if you need a lightweight, efficient method to collect raw network data from multiple machines for central logging and analysis.
Quick Start

For full instructions, refer to the PacketStreamer Documentation.
You will need to install the golang toolchain and libpcap-dev before building PacketStreamer.
# Pre-requisites (Ubuntu): sudo apt install golang-go libpcap-dev
git clone https://github.com/deepfence/PacketStreamer.git
cd PacketStreamer/
make
Run a PacketStreamer receiver, listening on port 8081 and writing pcap output to /tmp/dump_file (see receiver.yaml):
./packetstreamer receiver --config ./contrib/config/receiver.yaml
Run one or more PacketStreamer sensors on local and remote hosts. Edit the server address in sensor.yaml:
# run on the target hosts to capture and forward traffic

# copy and edit the sample sensor-local.yaml file, and add the address of the receiver host
cp ./contrib/config/sensor-local.yaml ./contrib/config/sensor.yaml

./packetstreamer sensor --config ./contrib/config/sensor.yaml
Who uses PacketStreamer?
- Deepfence ThreatStryker uses PacketStreamer to capture traffic from production platforms for forensics and anomaly detection.
Get in touch
Thank you for using PacketStreamer.
Start with the documentation
 Got a question, need some help? Find the Deepfence team on Slack
- productsecurity at deepfence dot io: Found a security issue? Share it in confidence
- Find out more at deepfence.io
Security and Support
For any security-related issues in the PacketStreamer project, contact productsecurity at deepfence dot io.
Please file GitHub issues as needed, and join the Deepfence Community Slack channel.
License
The Deepfence PacketStreamer project (this repository) is offered under the Apache2 license.
Contributions to Deepfence PacketStreamer project are similarly accepted under the Apache2 license, as per GitHub's inbound=outbound policy.
Quickstart
Building
Build the packetstreamer binary using the go toolchain as follows:
make
Advanced Build Options
Use the RELEASE parameter to strip the binary for a production environment:
make RELEASE=1
Use the STATIC parameter to statically-link the binary:
make STATIC=1
Build using Docker
Use the docker-bin target to build packetstreamer with Docker. The binary
will be statically linked with musl and libpcap, making it portable across
Linux distributions:
make docker-bin

# Alternatively, build a stripped release binary
make docker-bin RELEASE=1
Using locally
Run a PacketStreamer receiver
packetstreamer receiver --config [configuration_file]
You can use an example configuration file:
packetstreamer receiver --config ./contrib/config/receiver-local.yaml
You can process the pcap output in a variety of ways:
# pass the output file /tmp/dump_file to tcpdump:
tail -c +1 -f /tmp/dump_file | tcpdump -r -
# Edit the configuration to write to the special name 'stdout', and pipe output to tcpdump:
./packet-streamer receiver --config ./contrib/config/receiver-stdout.yaml | tcpdump -r -
Run a PacketStreamer sensor
sudo packetstreamer sensor --config [configuration_file]
You can use an example configuration file:
sudo packetstreamer sensor --config ./contrib/config/sensor-local.yaml
When running the sensor remotely, edit the configuration file to target the remote receiver.
Testing PacketStreamer
You can generate some test traffic using your favorite load generator - ab, wrk, httperf, vegeta. For example, to use vegeta:
# install vegeta
go install github.com/tsenart/vegeta@latest

echo 'GET http://some_ip:80' | vegeta attack -rate 100 -duration 5m | tee results.bin | vegeta report
Using with Docker
Build a Container Image
Use the docker-image target to build a container image:
make docker-image

# Alternatively, build a stripped release binary
make docker-image RELEASE=1
Testing on Docker
PacketStreamer container images can be tested locally on Docker.
Receiver side
docker run --rm -it \
    -v $(pwd)/contrib/config:/etc/packetstreamer \
    -v $HOME/container_tmp:/tmp \
    -p 8081:8081 \
    deepfenceio/deepfence_packetstreamer \
    receiver --config /etc/packetstreamer/receiver.yaml
Sensor side
docker run --rm -it \
    --cap-add=NET_ADMIN --net=host \
    -v $(pwd)/contrib/config:/etc/packetstreamer \
    deepfenceio/deepfence_packetstreamer \
    sensor --config /etc/packetstreamer/sensor-local.yaml
The sensor requires --net=host and NET_ADMIN capability in order to capture
all of the packets on the host.
echo 'GET http://some_ip:80' | vegeta attack -rate 100 -duration 5m | tee results.bin | vegeta report
The pcap dump file is available in $HOME/container_tmp/dump_file.
Using on Kubernetes
PacketStreamer can be deployed on Kubernetes using Helm:
kubectl apply -f ./contrib/kubernetes/namespace.yaml
helm install packetstreamer ./contrib/helm/ --namespace packetstreamer
By default, the Helm chart deploys a DaemonSet with sensor on all nodes and one receiver instance. For the custom configuration values, please refer to the values.yaml file.
Using on Vagrant
On a single host, you may use Vagrant to run sensor and receiver hosts easily:
Install Vagrant according to the official instructions.
By default, Vagrant uses Virtualbox; you should install
vagrant-libvirt, using
vagrant plugin install vagrant-libvirt.
Start the two Vagrant VMs, receiver and sensor:
vagrant up

vagrant status
# Current machine states:
#
# receiver                  running (libvirt)
# sensor                    running (libvirt)
SSH to those VMs (in separate terminals) by using the following commands:
vagrant ssh receiver
vagrant ssh sensor
On each, enter the source code directory:
Receiver side
cd PacketStreamer
./packetstreamer receiver --config ./contrib/config/receiver-vagrant.yaml
Sensor side
cd PacketStreamer
sudo ./packetstreamer --config ./contrib/config/sensor-vagrant.yaml
Generate some live traffic
echo 'GET http://some_ip:80' | vegeta attack -rate 100 -duration 5m | tee results.bin | vegeta report
Plugins
This documentation section is about plugins which allow to stream packets to various external storage services.
Plugins can be used both from:
- sensor - in that case, locally captured packets are streamed through the plugin
- receiver - all packets retrieved from (potentially multiple) sensors are streamed through the plugin
Currently the plugins are:
S3
The S3 plugins allows to stream packets to the given S3 buckets.
Configuration
AWS credentials
Before running PacketStreamer, AWS credentials need to be configured by one of the following ways:
AWS_ACCESS_KEY_IDandAWS_SECRET_ACCESS_KEYenvironment variables~/.aws/configfile - it can be created byaws configure
The first way might be more convenient when running as root (required when running a sensor).
Configuration scheme
S3 plugin configuration has the following syntax:
output:
  plugins:                         # optional
    s3:
      bucket: _string_
      region: _string_
      totalFileSize: _file_size_   # optional; default: 10 MB
      uploadChunkSize: _file_size_ # optional; default: 5 MB
      uploadTimeout: _timeout_     # optional; default: 1m
      cannedACL: _acl_             # optional; default: Bucket owner enforced
Sensor configuration
If you want to stream locally captured packets from sensor to S3, you can use the following example configuration from contrib/config/sensor-s3.yaml:
output:
  plugins:
    s3:
      region: eu-west-1
      bucket: foo-pcap
      totalFileSize: 10MB
      uploadChunkSize: 5MB
      uploadTimeout: 1m
      cannedACL: bucket-owner-full-control
pcapMode: all
And run PacketStreamer with it:
sudo packetstreamer sensor --config ./contrib/config/sensor-s3.yaml
Receiver configuration
If you want to stream packets from receiver to S3, you can use the following example configuration from [contrib/config/receiver-s3.yaml]
input:
  address: 0.0.0.0
  port: 8081
output:
  plugins:
    s3:
      region: eu-west-1
      bucket: foo-pcap
      totalFileSize: 10MB
      uploadChunkSize: 5MB
      uploadTimeout: 1m
      cannedACL: bucket-owner-full-control
packetstreamer receiver --config ./contrib/config/receiver-s3.yaml
Using with other tools
Suricata
PacketStreamer's output can be used for threat detection with Suricata.
From file
If receiver is configured with the File output, the file can be used as an
input to Suricata with the following commannd.
tail -f /tmp/dump_file | suricata -v -c /etc/suricata/suricata.yaml -r /dev/stdin
It assumes that:
- Suricata's configuration file is
/etc/suricata/suricata.yaml. - PacketStreamer receiver is configured with output file to
/tmp/dump_file.
Example receiver configuration:
input:
  address: 0.0.0.0
  port: 8081
output:
  file:
    path: /tmp/dump_file
From stdout
When PacketStreamer writes to stdout, the output can be directly piped to Suricata:
./packet-streamer receiver --config ./contrib/config/receiver-stdout.yaml | suricata -v -c /etc/suricata/suricata.yaml -r /dev/stdin
Configuration
packetstreamer is configured using a yaml-formatted configuration file.
input:                             # required in 'receiver' mode
  address: _ip-address_
  port: _listen-port_
output:
  server:                          # required in 'sensor' mode
    address: _ip-address_
    port: _listen-port_
  file:                            # required in 'receiver' mode
    path: _filename_|stdout        # 'stdout' is a reserved name. Receiver will write to stdout
  plugins:                         # optional
    s3:
      bucket: _string_
      region: _string_
      totalFileSize: _file_size_   # optional; default: 10 MB
      uploadChunkSize: _file_size_ # optional; default: 5 MB
      uploadTimeout: _timeout_     # optional; default: 1m
      cannedACL: _acl_             # optional; default: Bucket owner enforced
tls:                               # optional
  enable: _true_|_false_
  certfile: _filename_
  keyfile: _filename_
auth:                              # optional; receiver and sensor must use same shared key
  enable: _true_|_false_
  key: _string_
compressBlockSize: _integer_       # optional; default: 65
inputPacketLen: _integer_          # optional; default: 65535
gatherMaxWaitSec: _integer_        # optional; default: 5
logFilename: _filename_            # optional
pcapMode: _Allow_|_Deny_|_All_     # optional
capturePorts: _list-of-ports_      # optional
captureInterfacesPorts: _map: interface-name:port_ # optional
ignorePorts: _list-of-ports_       # optional
You can find example configuration files in the /contrib/config/
folder.